

Clay Brick: Build A Brick Braai, Barbeque or Firepit
Build yourself a barbeque, braais or firepit and take the guesswork out of creating somewhere magical you can enjoy good food on an open fire. With Clay Brick you can’t go wrong.
![]()
![]()
![]()
![]()
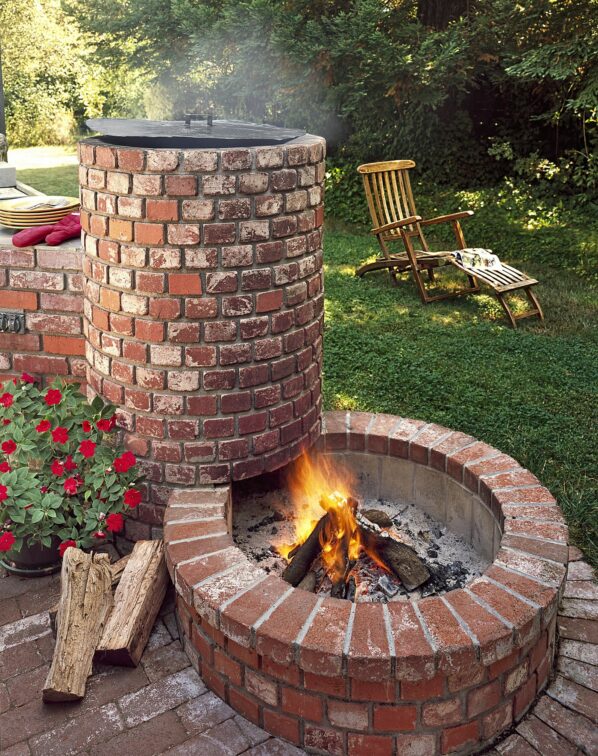
Brick braais are perfect for a large patio. A braai is not a difficult project, and you should be able to complete it in a weekend.
Choose your ideal location
- Locate the braai where it will be well-ventilated because you will be lighting a fire in it,
- Leave ample space to the left and right of the braai for tables to place meat and spices, and for traffic in front of it. People love to stand in front of a braai!
- It should go without saying – build your BBQ a safe distance from anything flammable (including your deck or fence!),
- Locate the braai where the smoke won’t fill your house or annoy your neighbours.
Materials
Materials
- Choose clay bricks that blend in with the surroundings – clay bricks are available in a wide rang eof colours and textures.
- Ordinary clay brick can withstand heat up to 900 °C, so you don’t need special “fire bricks” or expensive “refractory bricks”.
- Clay bricks are dense, making them great insulators. This gives plenty of nice, even heat to cook on. People and nearby timber structures will be protected by clay masonry walls.
- Concrete and mortar are poor insulators therefore you must choose fire-resistant mortar. Cement foundations will require a base layer of clay bricks or rocks to protect it from cracking.
- Never use a concrete brick in a braai, fireplace or firepit. Concrete bricks are dried in the sun, and because they can contain air bubbles they can shatter or even explode when exposed to high temperatures.
- Painted surfaces cannot withstand high temperatures (even high-temperature engine paints will not withstand the heat of a large fire. Rather rely on the natural couring of clay bricks to provide an attractive, no-maintenance finish.
Sizing
- Brick structures are adaptable in terms of sizing and height, so buy your grill set first and use this to determine the internal width of your brickwork.
- Build your formation in a rectangular shape to bricklaying easier – structures that are symmetrical are much simpler.
Construction
- Level the ground before you start building. Dig into the ground at least 10cm. Once level, add a cement foundation and level again. If you do not lay down a foundation for your brick grill, it may become unsettled later from water, heat, and cold. This can cause your bricks to crack, making the whole grill unstable.
- As you are constructing the brick layers, use a level to be sure all sides are plumb. Having a side that is lower or higher than the others will cause your project to not only look odd, but it can cause damage later from the pressure or tilt.
- Leave 10cm of open space below the grill pan to allow air flow. The charcoal needs to have air flowing around it.
- Although you will be tempted to fire up your firepit as soon as it is built, please wait for seven to 10 days for mortar and cement to cure and harden before using. If you have a clay brick fit pit with no mortared joins, you do not need to wait – clay bricks are kiln-fired making them ceramic.
Now you have all the tools needed to create the perfect braai or firepit at home. Visit Clay Brick for more useful information and tips.


You might also like...
-
Beauty Fires: A longer warranty says more than a brochure ever could

When people choose a fireplace, a braai or a pizza oven, they may think they are buying a functional object. In truth, they are committing ...
-
Naturally Slate: A Century of Confidence Above Every Home

From Highveld summers to coastal storms, South African homes and buildings demand materials that are built to last. In a world where roofing choices are ...
-
Outdoor Living, Reimagined

There is something timeless about gathering outdoors. Whether it is a casual weeknight meal with family or a lively weekend get-together with friends, the most ...
-
Effortless Greenery | Leaf & Living Artificial Greenery Solutions

As winter settles in and outdoor greenery begins to feel the effects of changing weather, Leaf & Living presents a refined solution for maintaining lush, ...


Visit SA Decor & Design on social media


